
|
|
|||||||
|
|
|
|
|
|
|
|
|
|
|
|||||||
LCD DESIGNS >> TUTORIALS >> Making a Waving Flag...c'mon be patriotic
This
tutorial will show you how to create a flag that seems to be flapping in
the wind. You'll also discover the "Displace" filter. This filter is not
mentioned by very many other online tutorials that I've come across. I
suppose that this is because most people don't really understand how the
displace filter works. The results can seem a little weird. However, there
is no other easy way to achieve consistent results for the type of effect
I'm about to demonstrate. The only other way to create an image of this
type is to draw it by hand.
I have seen this technique asked about many times in the past and have
seen the questions go unanswered. This effect is fairly straightforward,
though, and can be followed quite easily.
To start off you'll need an image of a flag. I'm going to use my Indian
flag.
After loading the image I increased the canvas
size, adding 50 pixels to the width and 30 to the height. This was necessary
because the image will be expanding as it curls. If you don't expand the canvas
(using Image, Canvas Size) the tops and bottoms of the curls will be cut off.
With your flag ready the next step is to create the bump, or displacement,
map. A bump map is an image that is used to displace pixels in different
directions. This is quite common in 3D programs. If you've done some of the
other GrafX Design Photoshop tutorials--the ones that use channels--you've used
a displacement map already.
Create a new image with the same dimensions as your flag image.
NOTE: You can find the dimensions of your flag image by ALT-clicking the
lower-left corner of the main window. There should be a display that says "Doc:"
followed by the file size in K. Clicking in that area will display more document
info.
Select the Marquee tool and, after clicking on the Marquee Options tab, set
the Shape to Rectangular and the Style to Normal.
Starting in the upper-left corner select about half of the image.
Select
the Gradient tool and click the Gradient Tool Options then click the Edit button
to bring up the Gradient Editor dialog box.
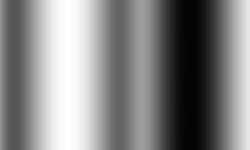
You'll want to set the gradient so that it resembles the one below.
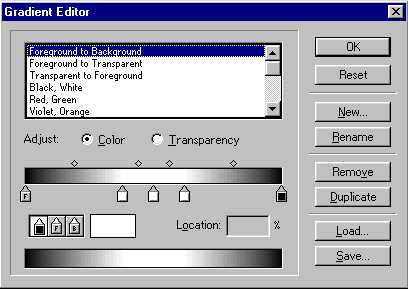
You
can change the color above each slider by selecting the slider and then clicking
on the small color swatch below the sliders. You can add sliders by clicking
under the gradient example (I've added three near the middle and set them to
white). Once you've got the gradient set up, click OK.
Click-and-drag the mouse from the left side of the selected area to the right
side. You can hold down the Shift key to keep the direction line horizontal.
Choose Select, Inverse to select the other side of the image.
Fill this side with the same gradient.
Choose Image, Adjust, Invert to invert the gradient on the right side of the
image. You'll now have something similar to
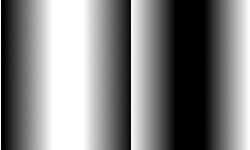
Because
of the way the Displace filter works, and the fact that you want a series of
curves in the flag and not a series of diagonal lines, you'll need to soften the
transitions between the blacks and the whites in the bump map.
Choose Filter, Blur, Gaussian Blur and set a fairly high value. The exact
value you choose will depend on the size of the bump map you've created and its
resolution. For my bump map, which is 250x150 @ 72 dpi, I set the value to 10.0.
This gave me the final bump map you see
Save the bump map as a PSD file and note the directory you saved it in.
Make the Flag image current by clicking on its title bar.
Choose Filter, Distort, Displace.
Set the Horizontal Scale to 0% and the Vertical Scale to 10%. Again you may
have to play with these values depending on the size/resolution of your image.
You can ignore the Displacement Map settings, because the displacement you
created is the same size as the image, and set the Undefined Areas to Repeat
Edge Pixels.
When you click OK you'll be presented with a "Choose a displacement map"
dialog box. Choose the bump map file you saved (browse through your drive if
necessary).
Hmmm... It looks pretty good but something is missing. Highlights and shadows
would probably complete the 3D illusion, right? Using the same bump map and
Photoshop's built-in Render Lighting filter you can add the needed highlights
and shadows.
Make the bump map file current by clicking its title bar (re-load it if
necessary).
Choose Select, All and Edit, Copy.
Make the Flag image current by clicking on its title bar.
Select the Channels tab and create a new channel by clicking on the small
bent-cornered icon at the bottom of the channels palette.
Choose Edit, Paste to paste the bump map into the channel.
Go back to the layers view by selecting the Layers tab.
Make the flag layer active by selecting it in the Layers palette.
Choose Select, None.
Select the Magic Wand Tool and click anywhere outside of the flag.
Choose Select, Inverse to select only the flag.
Choose Filter, Render, Lighting Effects. Experiment with the settings until you get a good result.
Set the light so that it comes in from the
upper-left and gives you a good highlights/shadow combination. Click OK.
Choose Select, None and you should end up with something that resembles this: